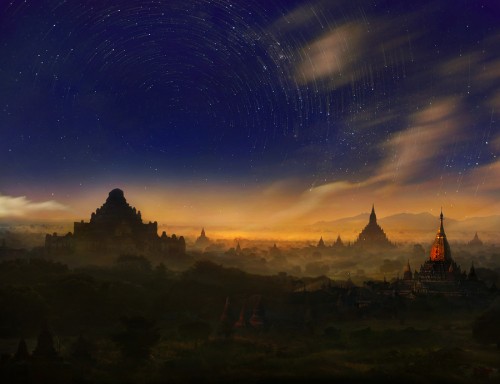
As our planet Earth rotates around its axis every 24 hours, the star field that we see in our night sky rotates around the polar axis in a complete circle. Of course, in reality the star field is relatively stationary with respect to the Earth (over ages it is not, but in the context of our lifetime it is); it is the Earth that rotates about its own axis. Photographing the night sky can be a surreal experience, and star trail photography is highly rewarding if you have a bit of patience.
Gears You Need:
This isn’t a lesson in shooting long-exposure images; this is a lesson in shooting really, really, really long-exposure images (like 1 hour or more). Because you’ll need to keep your camera absolutely still for a minimum of 20 minutes, but probably more like an hour or more (the longer the exposure, the longer the star trails will be), you want to use a really sturdy tripod, and use a ballhead that won’t slip even a tiny bit during that hour (or two or more). You’re also going to need a cable release, so you don’t have to stand there holding your shutter button down for an hour (a cable release can lock your shutter down for as long as you need). Also, depending on the time of year, and your location, it might get quite cold out where you’re shooting, and you could get a frost buildup on your lens. Believe it or not, your exposure is so long that you can wipe your lens with a cloth and it won’t affect the shot, so if frost is a possibility, you’d better bring along a clean cloth. If you do bring a small flashlight (it’s going to be mighty dark out there), make sure you don’t shine it into the lens when you’re wiping away that frost—keep that far away.
Now The Tips:
Start by choosing a clear night sky for shooting, far away from the lights of the city, and try to compose your shot so there is something low in the foreground (like the tops of mountains, or a silhouette of treetops, or even houses), and compose it so the moon isn’t visible in the shot (its reflected light will mess up the rest of the shot). Next, you’ll want to set up your camera (which should be on a tripod, with a cable release attached) facing north (use a compass or a compass app on your smart phone to figure out which way to aim), then find the North Star and put it in the center or on the very edge of your image. Set your lens’s focus to “Infinity” by switching your lens to Manual mode (flip the switch right on the lens), then turning the focus ring on the camera all the way until you see the infinity symbol (which looks like this: ∞) on the top of the lens (that way, your lens doesn’t try to refocus at some point, which would trash the image). Then, set your ISO to 200 (for Nikons) or 100 (for Canons) to get the cleanest image possible. Next, switch your shooting mode to manual, and set your aperture to as low a numbered f-stop as your lens will allow (for example, f/4, f/3.5, or f/2.8) to let as much light in as possible.
Now, set your shutter speed dial to bulb mode (which means the shutter will stay open as long as you hold the shutter button down), then press the shutter button on the cable release, turn on the lock, and start your timer, then unlock at the amount of time you’re willing to invest (no less than 20 minutes, but ideally an hour or more) and you’re there! On the next page, we’ll talk more about the gear you’ll need for shooting star trails.
Other Articles you may like to read
12 Tips for Stunning Portrait Photography


Leave a comment